Difference between revisions of "3.6 Updating Input Data"
| Line 86: | Line 86: | ||
*Locate the TAZ to be updated on the map or use the ‘find network object’ feature by pressing the F3 key on the keyboard or clicking the search icon on the network editor menu bar: | *Locate the TAZ to be updated on the map or use the ‘find network object’ feature by pressing the F3 key on the keyboard or clicking the search icon on the network editor menu bar: | ||
[[File:Find_Zone.png]] | [[File:Find_Zone.png]] | ||
| + | |||
| + | *After locating the TAZ/Zone, double-click the network object to open the edit Zone view. Go to the ‘User-defined attributes’ tab. Update the ‘HMUNITS’ data field | ||
| + | [[File:Edit_Zone_Hotel.png]] | ||
<h2>Activate a dummy TAZ</h2> | <h2>Activate a dummy TAZ</h2> | ||
Revision as of 05:39, 12 March 2023
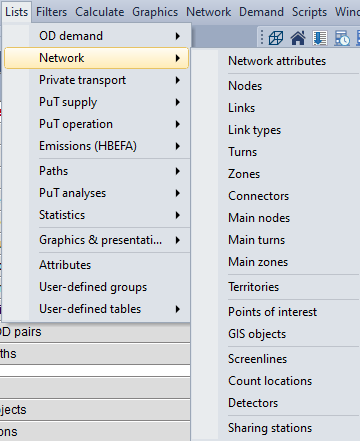
Most input data in NERPM-AB is stored within the Visum version file. The MAZs in NERPM-AB are represented as the Point of Interest (POI) layer. TAZs are represented as Zones. The MAZ and TAZ level data is stored as the POI and Zone database (referred to as ‘list’ in Visum). The link and node level data are stored in the link and node lists. The lists can be viewed from the ‘Lists’ menu item as shown below in Figure 3-2.
FIGURE 3-2 PTV Visum List Menu
The data specific to tools are stored in their respective directories. For example, the seed sample and marginal control distribution data for PopulationSim are stored in the appropriate folder within the Population Synthesis directory (\tools\Population_Synthesis). The all-streets network data required for DaySim data tools are stored in the appropriate DaySim data tools directories (\tools\DaySim_Data_Tools).
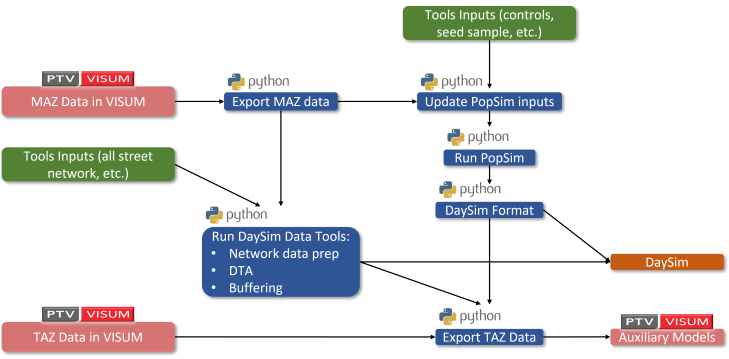
The input data processing in NERPM-AB is streamlined using the Visum procedure sequence (Synthetic Population/DaySim Data Tools group). Visum interfaces with various tools via Python scripts. The tools need to be run in a specific sequence as outputs from one tool become input to the next tool. The exchange of data between various tools is fully automated. All tools need to be run only once for each model run. For subsequent runs, these tools need to be run only when specific inputs are changed. The flowchart below shows the input data workflow between various tools.
FIGURE 3-3 NERPM-AB V2.2 DATA PROCESSING WORKFLOW
Below are instructions on making a few example input data changes.
Contents
Adding 100 households to a MAZ
Assuming the tools in the Synthetic Population/DaySim Data Tools group have been run at least once, follow these steps to add 100 households to a MAZ:
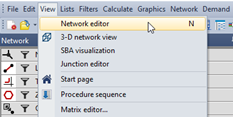
- Open network editor
- Switch on and activate the POI layer in the Network panel:
- Locate the MAZ to be updated on the map or use the ‘find network object’ feature by pressing the F3 key on the keyboard or clicking the search icon on the network editor menu bar:
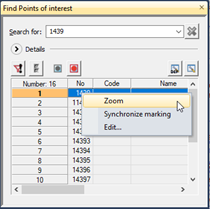
Enter the MAZ ID of interest in the search network object and right-click to zoom into the object
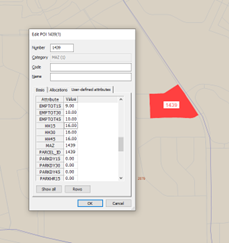
- After locating the MAZ/POI, double-click the network object to open the edit POI view. Go to the ‘User-defined attributes’ tab. Update the HH15 field if making changes to the base year model or update the appropriate field.
- After updating the appropriate field, run the ‘Synthetic Population/DaySim Data Tools’ group with the following procedures activated:
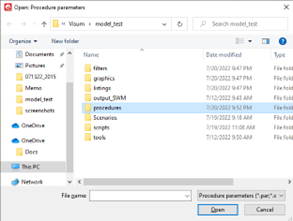
Alternatively, load the ‘MAZ_HH_Update.xml’ procedure parameters file which has the settings saved for this modeling task. Left-click on the ‘open procedure parameters’ icon:
Select the ‘MAZ_HH_Update.xml’ from the procedures directory in the open procedure parameters window. Thereafter, follow the steps in the 5.3 DaySim Input Preparation - Running the Model section to run the procedure sequence with the activated procedures.
Adding 100 employment to a MAZ
Assuming the tools in the Synthetic Population/DaySim Data Tools group have been run at least once, follow these steps to update the employment data of a specific MAZ:
- Open network editor
- Switch on and activate the POI layer in the Network panel:
- Locate the MAZ to be updated on the map or use the ‘find network object’ feature by pressing the F3 key on the keyboard or clicking the search icon on the network editor menu bar:
Enter the MAZ ID of interest in the search network object and right-click to zoom into the object
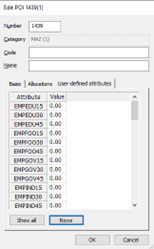
- After locating the MAZ/POI, double-click the network object to open the edit POI view. Go to the ‘User-defined attributes’ tab. Update the appropriate employment data field.
- After updating the appropriate field, run the ‘Synthetic Population/DaySim Data Tools’ group with the following procedures activated
Alternatively, load the MAZ_Emp_Update.xml procedure parameters file which has the settings saved for this modeling task. The export TAZ data step aggregates the MAZ-level employment data to update the TAZ-level data. Thereafter, follow the steps in the 5.3 DaySim Input Preparation - Running the Model section to run the procedure sequence with the activated procedures.
Adding additional room to a TAZ
Assuming the tools in the Synthetic Population/DaySim Data Tools group have been run at least once, follow these steps to update the hotel room data of a specific TAZ:
- Open network editor
- Switch on and activate the ‘Zones’ layer in the ‘Network’ tool window:
- Locate the TAZ to be updated on the map or use the ‘find network object’ feature by pressing the F3 key on the keyboard or clicking the search icon on the network editor menu bar:
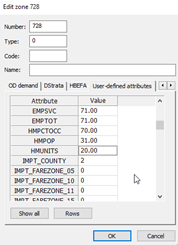
- After locating the TAZ/Zone, double-click the network object to open the edit Zone view. Go to the ‘User-defined attributes’ tab. Update the ‘HMUNITS’ data field
